Lettuce, Potato, and Making a Rain Barrel

This weekend was cleanup weekend.  Because of the forrest behind the house, the back yard was 100% covered with leaves.  The neighbor is very religious about blowing the leaves off of his yard everyday – and unfortunately he stops right at the property line in the back so there is a nice mound of leaves where he sorta just pushes them off his property for me to cleanup.  Oh well – that is fine because I spent at least six hours raking and mulching up all of the leaves in the yard yesterday.

Even after doing this, I still don't have enough leaves to cover the gardens!  I got the garden next to the house fully covered:

Garden with Mulched Leaves

And I also got about 2/3 of the garden behind the garage filled in (not shown).  Before filling in the areas, I filled up two garbage containers full of leaves and this new addition:

Leaves in 55 Gallon Drum

I purchased this 55 gallon drum at a local car wash.  They get the car soap in the big 55 gallon drums.  These are well known for their use in collecting rain water from your downspouts – which is what my plan was.  I got the drum and was quite excited so I went up to Menards and purchased some PVC pipe and fittings to get this going.  My neighbor purchased one of these at a Master Gardener seminar a few years back for $25.  After getting it home, I cut a hole in the top and a hole in the side (as shown above).  The hole in the side is for the overflow  – so when the container gets full, it would overflow the rest down into the drain where the water originally went in the yard.

Well, originally this 55 gallon drum had two bung holes in the top of the lid.  The bung holes have a female screw-in built right into the lid.  So, I bought 2" PVC for the overflow – with both a male and female connector to attach to the side of the barrel.  I took the male part of the 2" PVC pipe and it fit PERFECTLY into the female bung hole.  Well, unfortunately, I had already put a hole in the top.

A guy at work says his dad owns an oil changing shop in a town close by – and they have a lot of these 55 gallon drums that were filled with windshield wiper fluid.  So, I asked him to get me three of them.  I went back to Menards and bought a 2" PVC T-connector and a couple of 2" PVC 90-degree elbows.  I then drilled a hole through one of the 90-degree elbows and placed a 1/2" male-threaded piece into the hole and used some PVC cement and put on several coats of it to make sure the hole was completely filled.  The goal is to use each of the 2" bung holes in the new 55 gallon drums I'll receive and tie them all together.  The bung holes will be at the bottom and then I'll drill a small 1" hole at the top of each of the barrels to release the water pressure as the water comes into the barrels.  By tieing all of the barrels together with the 2" PVC pipe,  the water will come into one barrel and all three barrels will even out as the water comes in.  Then, by tieing all of them together with the 2" PVC pipe and placing the 1" pipe right into the elbow, this will increase the water pressure for the hose attached with the 1/2" piece coming out of the elbow.  Below is a picture to show the top part of the barrel (contains the two bung holes and this is the piece I cut off of the current barrel).  This shows how the 2" PVC fits snugly into the drum's bung hole and the elbow with 1/2" PVC pipe attached – which will then run to a garden hose and to the garden:

2" PVC Pipe and 1/2" PVC Pipe for Hose Connection

The yellow piece on the end is just a simple valve for closing the pipe or opening the pipe up.  It is connected to a 3/4" PVC to 3/4" male threaded garden host connector – which was the most expensive part of the setup ($5 for it!).

I should get the three barrles – hopefully tomorrow (Monday) and I will begin the actual setup of the whole system of three barrels used to hold rain water and to water the garden with next year.

Meanwhile, back to the garden.  I was digging up the strawberries in the back of the house to relocate them to the front garden bed.  The deer got in and did some damage to the strawberries that were transplanted last week so I also dug them up and relocated them to the part of the garden that is enclosed with deer netting:

Front Garden

You can see the strawberries covering the right part of the garden – there are probably about 30 in there now after the deer really tore up the other ones that were not protected.

While digging up the strawberries in the back, I came across another potato!  This weight 1/2 an ounce less than a pound!

Kennebec Potato found wihle digging strawberries

In addition to this potato, I took a look at the potato bin that was cleared out and was surpirsed to see that this little potato is trying to grow!  This is in the same exact spot as the only potato that lived to grow all the way to the top:

Kennebec Potato Growing

After digging up the potato and transplanting the strawberries, I opted to pick some more lettuce.  I got just a little above 3 ounces.  I then spread some fertilizer over the area where the lettuce is – thinking maybe the area isn't rich in nitrogen or some other nutrient is missing.

Lettuce Pickings

Pretty amazing that I'm still getting just a little bit of produce from the garden.  We had two nights where it frosted this week – and the lettuce still seems to be growing just as it was.  The pepper plants didn't do so well and many of the leaves withered down.

Lastly, a picture of the Flame Bunch grape vine.  Both the Flame Bunch and Concord grew very well this season.  The leaves are beginning to turn on them (even though almost all of the leaves from the other trees are gone).

Flame Bunch Grapevine

The two columnar apple trees (you can see one of them in the background – looks like a little stick out of the ground almost right in the middle of the picture on the bottom) didn't do well at all this season – and I don't think they grew at all.  This is all blamed on the deer that pulled all of the leaves off of them over and over as they set leaves.  I tried to put some deer netting over them to allow them to grow, but it just didn't work very well.  Really a shame since these were about $27 each at an online nursery.  But, I have been debating now whether to actually plant two dwarf apple trees in place of these.  Unfortunately, the dwarf apple trees would cost about $80 each because I would want a tree that would be a few years old so we would get fruit farily quickly.  But, I would have the same problem as I do with the columnar apples and the Granny Smith apple tree we already have – the deer.  I'm simply at a loss on how to get the deer to leave the trees alone.  At least the Granny Smith tree still has a few leaves on them – but the deer netting is smorthering the tree and is causing the branches to curl inwards a bit.

Cleaning the Strawberry Patch

Over the course of the year, the strawberry patch soil has compacted.  Because of this, it was a good four-five inches lower than when I originally filled it.  Because the bed is only a foot deep with plastic landscaping fabric underneath (have to keep the Zoysia grass from growing in!), this only leaves seven to eight inches of growing area for the roots.

Last weekend I was able to get one patch all cleaned up and done.  Today – while it was only 52 degrees out, it was sunny and it had to get done.

 The patches look better now and I found a few big ripe strawberries that were pretty good.

 So, here are the finished strawberry patches for the year:

Strawberry Pyramid

Strawberry Patch


During the time the strawberry patches had to be cleaned out, there were also several other strawberry plants that had grown up.  The Tri-Star strawberries – like almost all other strawberries – make "runners".  They put out these stem-like extensions and a new strawberry plant is created from them.  Well, I uncovered and pulled out about 16 plants from the first  patch last weekend – and pulled out 26 this weekend!  So, I have almost doubled the number of strawberry plants between the two beds.  During the summer I pulled out a bunch of them as well and put them on the compost pile.  This time I planted them in the large front raised bed.  If they survive over the winter, I plant to give them away to my parents and the neighbor if he is interested.

Here are all of the runners that have been transplanted:

Tri-Star Strawberry Runners

 I plan to mulch up a lot of leaves since our driveway is fully covered with them – and put them over the top of the strawberries.  Hopefully this will keep them 'insulated' enough to survive the winter.

Lastly, a picture of the grape vines.  They are beginning to die back and ready themsleves for winter as well.  They definitely grew to the top of the arbor and even across the top of them in the first year!  I am looking forward to having some grapes to use for wine and table eating next year.  Unfortunately, only two of the four grapes that were planted survived.  While I was out fixing the strawberry beds, I noticed one of the dead vines was completely pulled up out of the ground – it snapped right off at the ground level.  So, I lightly pulled on the other dead vine and it also snapped right off as well.

Grape Vines

Gardening Numbers Are In!

Well, I have tabulated and tallied all of the numbers for the amount of weight for each of the items grown this year.  To me, this is pretty remakable but after seeing several other individuals have 500 pounds and even over 1000 pounds produced from their gardens, I am quite far from that.  But, I am happy with the amount this year.

  • Black Simpson Elite Lettuce – 11 pounds, 6 3/4 ounces
  • Radishes – 7 3/8 ounces (didn't grow well due to lack of sunlight I believe)
  • Tri-Star Strawberries – 19 pounds, 1/2 ounce (not bad for 48 plants just planted this year)
  • Dwarf Gray Sugar Peas – 12 pounds, 4 5/8 ounces (will not plant next year – too much work and we are not eating them)
  • Green Goliath Broccoli – 5 pounds, 10 3/4 ounces (total of 8)
  • Snowball X Cauliflower – 2 pounds, 4 3/4 ounces (total of 6 – will not plant next year)
  • Burpee A#1 Carrot – 18 pounds
  • California Wonder Bell Pepper – 32 pounds, 12 7/8 ounces (total of 130)
  • Green Beans (mix of Bush Blue Lake 274 and Bush Blue Lake 47) – 55 pounds, 13 3/8 ounces
  • Best Boy Tomato – 21 pounds, 14 1/4 ounces (total of 50)
  • Roma Tomato – 24 pounds, 9 1/2 ounces (total of 233)
  • Red Cherry Tomato – 3 pounds, 7 7/8 ounce
  • Yellow Onion – 5 pounds, 11 1/4 ounces (total of 28)
  • White Onion – 5 pounds, 12 3/8 ounces (total of 36)
  • Marketmore 76 Cucumber – 6 pounds, 10 3/8 ounces (total of 15)
  • Burpee Picker Cucumber – 4 pounds, 4 1/4 ounces (total of 12)
  • Sugar Dots Corn – 5 pounds, 14 7/8 ounces (total of 31 ears)
  • Peaches & Cream Corn – 8 pounds, 4 1/8 ounces (total of 43 ears)
  • Kennebec Potatoes – 16 pounds, 9 3/4 ounces

The grand total for the year came in at 260 pounds, 8 5/8 ounces of produce.

Now since I'm a numbers kind of guy, the next step will be to compare the cost of them at the local supermarket that we purchase groceries from.  Although all of the above were fresh and organic, I will compare them against the prices of the items we typically buy to get a **real** estimate of the amount of money that was saved with the garden this year.

Garden Cleanup & Pepper Harvest

The gardening season is almost fully at an end here.  The only produce left to grow is the lettuce.

I went around today and just took some various photos of the areas in their sad, brown/black state where all you can see is dirt with nothing growing.  A few areas still have plants intact because I've been a bit lazy with taking them out.

Here you can see the green beans in the bed on the back driveway.  I have left them in since they are nitrogen-fixing.

 Green Beans

Here is the bed where the potato bin was along with the carrots.  The potato bin has been dismantled in the front and all of the soil/compost taken out.  I'm hoping for better luck next year because the first attempt at this potato bin was a bust.

Potato Bin

And here is where the potatoes were grown directly in the ground next to the house.  This is where the majority of the potatoes came from.  There are a few Tri-Star Strawberry plants that are still growing here.  I planted two of them since I had extras at the beginning of the year – and now there must be six or more.

Potato Area

 And the lonely area next to the house.  You can see a new item in this picture – a TV antenna!  There used to be a TV antenna in this area before it was blown down by a bad winter storm a few years back.  With the help of the neighbor, I grinded down all of the rust from the antenna and put on some aluminum paint to make it look brand new!  Now we get all of the local channels in at no cost in good stereo sound – and in HD-quality!

Side Garden & TV Antenna

And the back garden behind the garage.  The cucumbers and tomatoes planted here didn't have a good year – although we did get a decent amount of roma tomatoes.  Next year I am going to be required to find a new spot for the tomatoes and cucumbers – just because I've grown tomatoes in this bed now for two years.

Back Garden

And now for the front garden.  Most everything has been taken out of this area.  I have left the pepper plants in to see if the few remaining peppers will grow any larger.  Back on the 20th, I pulled the last of the pappers – more on that later.

Front Garden

The lettuce is the only thing remaining that will possibly yield some produce.  This fall crop of Black Simpson Elite lettuce just didn't take off nearly as well as the spring crop – although we can get some of these harvested at this point.

`Lettuce

 Anyways, on to the peppers.  On October 20th, I went out and picked all of the remaining peppers that were fairly decent size on the eight California Wonder pepper plants.  None of them have been turning from green to red because the temperatures for the past month have been unseasonably cooler.  We had a few 70-degree days, but not many.  In addition, the rain just won't let up and we've been drenched with what seems like at least an inch or more of rain a week!  Just a few days ago we had over three inches of rain over a two-day period.

After picking the peppers, they all weighed in at just over nine pouneds!  That sure is a lot of peppers and will add greatly to the overall total weight.

Peppers

Peppers

Tonight I am going to go through my gardening journal and begin tallying up the total weight of produce harvested from each of the different veggies and post those results next time.

To end today's post, I thought I would leave you with a few pictures of the forrest behind our house with the changing of the leaves.

Forrest Leaves

Forrest Leaves

Applesauce & Potatoes

Wow, it has been several weeks since my last post.

There hasn't been a lot going on in the garden for a few weeks – hence the non-existent posts.

Over the weekend, I took down the green fence that protected the garden behind the garage and beside the house from the deer.  All of the back garden that contained the tomatoes and cucumbers has been taken down.  The side garden has also been fully removed from corn.

The front garden had all of the green beans removed several weeks ago as well. The only thing remaining in the front yard is the California Wonder pepper plants and some Black Simpson Elite  lettuce.

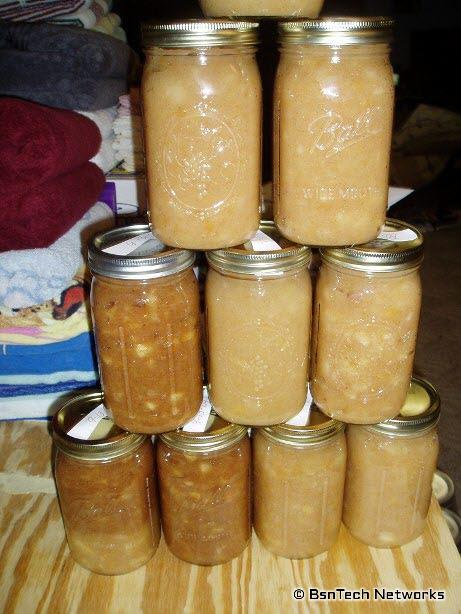
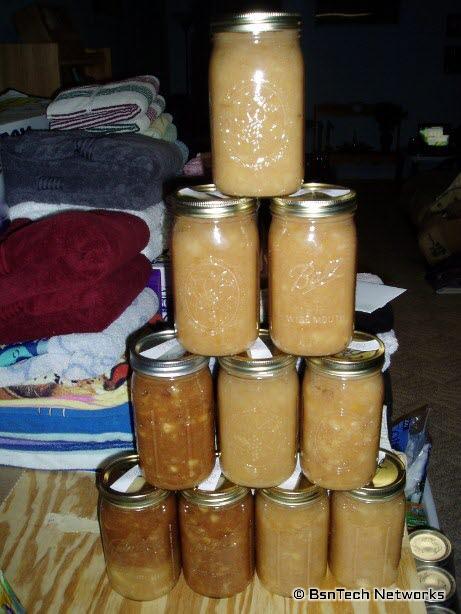
Back on September 17th, we made several jars of applesauce – 19 quarts to be exact.  This batch took about nine hours to fully peel, core, smash, and cook the applesauce.

Applesauce


Applesauce

A week later, we went back to Wolfe Orchards in Monticello, IL and got another nine pecks of second-hand apples that had blemishes or other irregularities.  We still had about 35 canning jars left, and I wanted to fill every last one of them!

This time though, we only used an apple corer.  This basically cuts out a circular piece in the middle that removes the core and then slices the apple into spears.  We then took those spears and put them into the food processor that took care of turning them into applesauce for us!  The peels were still attached but they were minced very finely.  It does make for a little bit of chewy applesauce, but all of your good nutrients are in the peels of the apple.

The first night we made 21 cans of applesauce – and it only took us about four hours to do this many!  What a big difference from the nine hours it took for the 19 jars last time.  A few days later, we then finished the other 14 cans.  Overall, it took us less time to make 35 quarts of applesauce using the food processor and apple corer leaving the peels on – than it did the other way making 19 quarts!


Now, for the corn.  The Sugar Dots corn left much more to be desired this year.  I wasn't at all impressed with the size of the corn coming from them after they were mature.  However, again I chalk that up to me leaving them in the small seedling planters for three weeks… ouch.  Next year I still plan to plant Sugar Dots corn – instead of the Peaches & Cream variety.


The Peaches & Cream corn variety did put on two ears on some of the stalks, but left only one good ear.  The ears were much better than the Sugar Dots, but there was some major issues with the pollen.  Pollen began dropping from the Peaches & Cream variety a full week before more than half of the stalks even had silk emerging!  So, overall, we got about 40 ears of corn – although most of them were very stubby and maybe two – three inches long at the most.  The best corn did come from the Peaches & Cream variety – but I was not impressed with how many we got.  Out of 60 that were planted, only about 25 were usable for anything.


The California Wonder peppers keep on producing!  I picked another three peppers yesterday and they are very good.  However, we will see the demise of these soon because the temperatures have been getting very close to the freezing point over the past few nights.


The Black Simpson Elite lettuce is almost a complete bust for this fall crop.  Out of about 14 that were planted, we have only had a harvest of about 5 ounces thus far.  The leaves are very small.


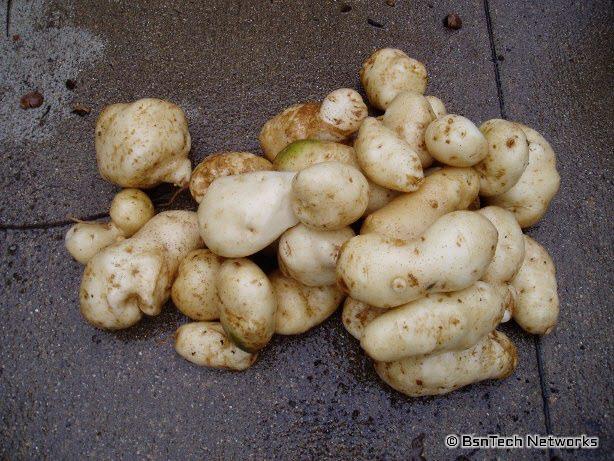
Lastly, let's get to the potatoes!  Today I pulled up all of the Kennebec potatoes from the garden beside the house – and also in the potato bin.


I am pretty happy with the potatoes that came from the garden beside the house.  Out of the eight or so potato plants, there was almost 12 pounds of poatatoes that was counted!  I found a happy little slug in the ground eating it's way through a pretty big potato – so I couldn't use it because it was mushy and bad.

Kennebec Potatoes

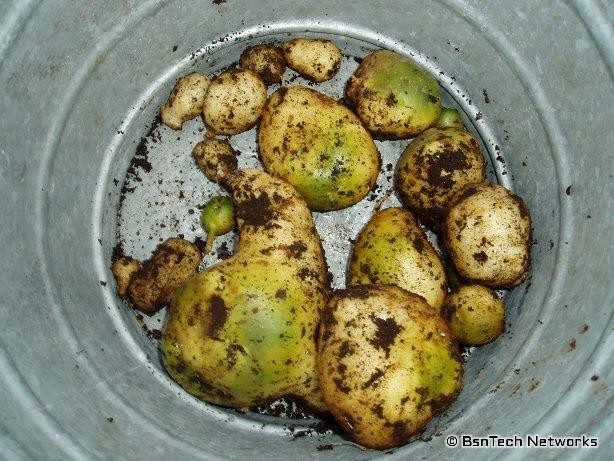
Unfortunately, the potato bin left more to be expected.  Right near the top of the stem of the potato plant, there were several Kennebec potatoes that I kept pulling off.  I sure was hoping that was a sign of things to come!  Welp, that was all the potatoes there would be.  It took about 45 minutes to uncover the entire potato bin, and the only potatoes there were was right on the top.  The stem was completely gone a few inches down into the soil.

Kennebec Potatoes

This measured in at about 2 pounds, 4 ounces.  Most of them are unusable because of the green in them since they were right at the top.  It is a shame because in prevoius pictures, this one potato plant that survived the box really had some huge foliage on it and made it look as though there were going to be tons of potatoes in the box.

Next year I do plan to try the potato box again – but this time I will most likely use straw as the plant grows taller instead of filling it in with soil.  Maybe this will help to keep the stem from rotting away.  In addition, I had my reservations about whether or not Kennebec potatoes would continue to grow in a potato box – because it is said that only late varieties of potatoes will grow and continue making potatoes all the way up the box.  Kennebec is a mid-to-late variety potato.  I'll have to see next year if I can find some russets for this experiment.  But, if next year also turns up a bust, then the potato bin idea will be scrapped and I'll use the space for something else.


Well, this ends this year's garden for the most part.  We'll continue to get some additional peppers and maybe a little more lettuce – but everything else has been cleaned out and gone.  I have several pages of information from the journal I've been keeping so I'll do a year-end tally once the peppers and lettuce are fully gone (frosted to death most likely soon) and post total results for comparison.


Garden Cleanup, Harvest, Apples

Time to add some pictures of how the garden is doing along with some of various things we've done!

At this point, the two cucumber plants (a Burpee Pickler and a Marketmore 76) have been tore down.  They were looking pretty bad when this picture was taken.  There was a lot of garden up-keep that was done on Monday of this week.

Cucumbers

The cucumbers were right next to the tomato plants – so I wonder if the fungus rolled over to the cucumbers.  Anyways, the two Roma tomato plants were also tore out – but both of the Best Boy plants were left.  One Best Boy tomato plant has six small tomatoes that started a few weeks back – and the other plant has a few flowers that may produce a few more tomatoes.

Tomato Plants

Looking pretty poor right?  You can see the PVC irrigation system in this photo as well with two pipes lying on the ground.  One goes all the way back to the cucumbers and the other feed the tomatoes.

Moving to the potatoes – we dug up some potatoes on Monday – this was just one plant that I planted right next to one of the roma tomatoes.  I was happy to see we actually got just under three pounds of potatoes from this one plant!

Kennebec Potatoes

There are six – eight other potatoes planted in another area – and as you can see, all of those vines are dead now as well.  I don't want to take them out of the ground for a bit until we are ready to use them though – I hope they don't rot!

Kennebec Potatoes

The one potato plant in the potato box is still growing strong – and shows no signs of it being ready to die back!  With almost three pounds of potatoes from the one plant that was just in the ground, I can't wait to see how many are in this 2.5-foot tall box!

Potato Bin

Some of the Sugar Dots corn was picked on Monday as well.  While pulling the corn that was 20 – 22 days after the silks emerged, I also pulled a good amount of corn stalks that didn't produce anything.  While I am happy we got some corn, I'm not impressed with how the corn turned out.  But, that is my own fault for leaving them in the small planting containers for three weeks.

Sugar Dots Corn

In this area of the garden, most of the corn didn't produce anything.  This was an area where there were only a few ears that produce out of the 36+ that were planted.

Corn

I was surprised that most of the corn in the front garden produced!  However, the corn in the picture above barely got any sunlight throughout the day because of the forest behind our house on the south side – so it shades this area for most of the day.

But, the front garden gets full sun all day.  Out of the 20 or so corn planted here, only one of them didn't produce anything.

Front Garden Corn

Here is some that was planted in buckets and placed in the safety of the deer netting under the arbor.  The deer sure like to get into anything they possibly can!

Grape Arbor, Strawberries, and Corn in buckets

Lastly, the corn in the side garden between the house and garage – which was the Peaches & Cream corn – is HUGE!  Look how tall it is compared to the gutters on the house!  Either it really is the soil that made them spurt the growth like that – or the Peaches & Cream variety grow just as tall as field corn.  Unfortunately, the corn started putting silk on about a week after pollen began falling.  So just a day or two after the pollen was completely gone, there was another 17 ears of corn that were ready for pollination – drats – because they would have been some nice ears of corn!

Peaches & Cream Corn

Moving on to the green beans – the green beans in the front bed are all insect infested.  The plants are dying off and production is slowing.  But, I've left them in the bed to help shade the ground and keep it cool and moist.  But this weekend will see the end of all of the plants.

But, the plants in the bed on the driveway are thriving and doing well!  These plants are about 45 days old now and are doing spectacular!  Just yesterday we picked just above three pounds of green beans.

Green Beans

The peppers in the front garden are also doing well.  We've found that we like the red peppers better – the California Wonder peppers are first green but when they mature, they will slowly turn red.  So, we've been waiting to pull the red peppers because they have a sweeter taste to them.  Today I picked six more peppers – almost 1.5 pounds worth!

California Wonder Peppers

Now for the lettuce – I'm not especially happy with the lettuce.  The planting we had in the spring was very good and there was a lot of lettuce.  However, the lettuce has now been in the ground for more than a month – and only a few are growing well – while the others seem stunted.  I wonder if it has something to do with the peppers shading them until about noon – when they begin to get sunlight.

Black Simpson Elite Lettuce

And finally – for our apple trip.  After looking for orchards online, I came across a small mom/pop orchard in Monticello, IL called Wolfe Orchards.  I gave them a call and told them that we wanted to make some applesauce – and was curious to know how much their apples were.  They told me that their apples were $8 a peck – but they did have "seconds" with bad spots in them from hail damage or disfigured ones.  They said those are half price and only $4 a peck.

So we took the short 20 minute drive to Monticello and purchased five pecks of apples for $20.  Wofe Orchards had quite a selection of different apples all nicely arranged.  We took almost all of their seconds – which was a great mixture of different varieties.  So, we got about 50 pounds of apples for $20 – that is less than 50 cents a pound!

We might go back again this weekend to get some more – because we still have about 38 cans to fill.  The 50 pounds of apples were all peeled and cored – and then ground into applesauce – all manually!  The wife & I were up until just after 3 am (started around 6:30 pm) making applesauce!  We made about 19.5 quarts of applesauce.

Next time we are just going to cut the apples and core then – then put them through the food processor.  I read online that in the food processor, it will mince the apples to the applesauce-like substance and the skins are so fine that you won't notice them.  That sure will aid the process!

Wolfe Orchards Apples

Here is some that was planted in buckets and placed in the safety of the deer netting under the arbor.  The deer sure like to get into anything they possibly can!


Garden Produce Winding Down

The garden is beginning to dwindle with production – and it seems a bit early.

The weather has been extremely odd this year.  We had a couple of weeks of 90+ degree weather early on in June – and then the rest of the year has seen between high 60's to mid 80's for the most part.  There has also been a lot of rain very often – so there was an abundance of disease this year as well.

Many people believe that they had some kind of early or late blight – or a fusarium wilt fungus on their tomato plants this year.  In reality, it was most likely Septoria Leaf Spot.  This fungus kills the leaves and stems of plants by working up the plant.  So, it will look as though there is dead leaves and stems from the bottom up.  Luckily this fungus does not effect the fruit so we still got a decent number of tomatoes.  However, Septoria devestated our two cherry tomato plants.  In years previous, I've harvested a half-gallon buck of cherry tomatoes every three-four days.  This year, we probably didn't even get a half-gallon buck full all year long.  These tomato plants were then dug up early and composted.

The Dwarf Grey Sugar peas also began to get a bad case of downey mildew all over the plants just a couple of weeks before they stopped producing as well.

On a side note, there are still several things left in the garden to harvest.  While most of the tomatoes have been pulled, there are still just a few more Roma tomatoes that are ripening on the vine.  The Best Boy tomato plants have all quite producing and those will be pulled up shortly.

The Marketmore 76 cucumber plant began wilting and leaves dying several weeks back – and we haven't had any cucumbers from this plant in just that amount of time.  A few days ago I did get another cucumber off of the Burpee Picker cucumber plant – although that one is also yellowing and dying as well.

The potatoes in the ground are all dying back now as well.  However, the potato in the potato bin is still growing strong and is doing very well.

The California Wonder peppers are also growing strong and continue to put on new peppers!  We have now been waiting for the peppers to turn red before picking them – so we'll have a variety of green and red peppers in the freezer.  I've been pulling a couple of red peppers a week – but there are still at least three dozen peppers on the eight plants.

The green beans in the front bed have about given up.  We are not getting too much production out of them any longer, but I keep them in place since they shade the raised bed and keeps the soil moist.  Since green beans are a nitrogen-fixing plant (meaning they put nitrogen back into the soil), I keep them going.

The green beans in the newest raised bed on the back driveway are now giving us most of the production.  A few days ago, the wife picked about three pounds of green beans – but that did include the front garden.  Most of them all came from the newest bed though.

The lettuce that was planted several weeks back are doing well – although there have been many that haven't made it or are looking sickly.  There are about five good-looking heads of lettuce that are forming, a few smaller heads that are recovering from their leaves falling off (don't know why that happened), and then a few others that are just about fully dead – they have a small leaf attached and that is all.  It doesn't seem like the lettuce is growing near as quickly as what it did in the spring time.  The weather has been between 60's and lower 80's throughout their time in the ground so it hasn't been too hot for the Black Simpson Elite lettuce.

The corn – very strange behavior for the Peaches & Cream corn.  The Sugar Dots corn only grew to about four – five feet high, but the Peaches & Cream corn is all well over 9 feet tall now and is almost touching the gutters on our house on the overhang. 

The Sugar Dots corn also began putting on silk from the ears of corn a few days after the pollen began emerging from the tassels.  So, I didn't have any problem having enough pollen to pollinate the Sugar Dots corn.  All of the Sugar Dots corn only put on one ear of corn – except there was one stalk that has two.  The ears are also smaller than normal – but again that is because they were in tiny planters that made them root-bound for three weeks.

Now – the Peaches & Cream corn…. The ears on these stalks are quite a bit larger than the Sugar Dots corn.  There are even a few stalks that have put on two ears on one Peaches & Cream stalk.  I was a little worried about this orignlaly and said I would stick with Sugar Dots for that reason – two ears of corn from one stalk.  However, after experiencing some trouble with Peaches & Cream, I do believe I am going to stay wth the Sugar Dots variety.

The Peaches & Cream corn began shedding pollen way before the ears were even emerging on the stalks.  It has now been at least two weeks since pollen began falling from the Peaches & Cream corn – and there are STILL some stalks that are just beginning to have their silk emerge.  Over the past holiday weekend, I marked another 20 stalks where the silks were coming out nicely.  Unfortunately, I do not have any pollen in order to pollinate these ears and these most likely will be bad ears of corn.  I don't know why this happened either.  The only thing I can attribute this to is the amount of nutrients in the compost that was used to make the bed the Peaches & Cream corn are in.  It seems the corn put all of its energy on making the stalk shoot 9 feet up, started to shed pollen, and then decided it was time to begin making the ears.

Overall though, we should get around 40 – 50 ears of corn this year although many of them will be small from the Sugar Dots corn.

How To Manually Pollinate Corn

Other search terms:
how to self-pollinate corn
how to self pollinate corn
how to pollinate corn
corn pollination 

This is the second posting in my blog on How to Manually Pollinate Corn.

Many gardeners do not have the room necessary to grow corn in blocks for the best pollination.  Even then, the natural method of spreading pollen onto the silks of corn isn't all that great – and meany times leaves the outer perimter of corn more to be desired.

In my garden, I have corn in three different beds.  One area has corn in rows of about 13 long and with 3 rows.  Another area only has one row of about 13 – and in the last one, about 15 rows long by 5 rows (two rows of these are in containers like five-gallon buckets).

In order to ensure that all the corn comes up well, it is best to manually pollinate corn.  I did this last year with the Sugar Dots corn and had great success – and I am doing the same this year.  Actually, I worked today on pollinating five stalks (since that is all that is ready at this point).

I have pictures in this entry to show the steps on how to do so.  Sure, it takes a little more time, but I believe it is worth the time to ensure every stalk supplies one – or even two very good ears of corn.

Step 1 –  Cut off the tassels from the stalks

Many folks just shake the tassels and expect the pollen to go down to the silks.  I don't go with this method – especially on windy days.  So, I actually cut off the tassels and then place them in a gallon ice-cream bucket.  Ocassionally throughout the day, I will shake the tassels in this container to release the pollen

Note – when you cut off the tassels, make sure that at some of the flower-looking buds that hold the pollen should already be opened.  This ensures that the tassels are beginning to mature and pollen is being produced.  Don't wait too long to where most of them are open, though.

Here is a picture showing about five tassels in the ice-cream bucket:

Corn Tassels Cut Off

Step 2 – Strain the pollen from the bucket (or where the cut-off tassels are located)

I use a smaller sour cream bucket with a very fine mesh over the top (basically I use a mesh that was used to make a screened-in patio).  I take the tassels and put them in another ice cream bucket – then empty the original ice cream bucket through the mesh into the sour cream container.  This will then allow the pollen to fall through and keep the buds out of the pollen.

Here shows sour cream container with a paint brush and a good amount of pollen (this was only from five tassels!).

Corn Pollen Shaken from Tassels

Step 3 – Cut down the length of the silks so they are easier to pollinate.

This step isn't necessary, but it makes pollinating the corn extremely easy.  All of the silks go every which-way but if they are all cut to on length close to the leaves, they all "glob" together and ensure that the pollinating is even and uses as little pollen as possible (if you don't have a lot of pollen in the first place!).

Step 4 – Use a paint brush to pick up pollen and brush over the silks

Very easy to do – especially if you went through Step 3 and cut the silks to all the same length.  Gently put the paint brush into the container with pollen and dab it on the silks.  Make sure you are thorough and get on all sides of the silks and ensure each one has pollen.

Here is a photo of the silks covered with pollen and also cut back to one size.

Corn Silks cut with Pollen on them

Step 4 (Optional) – Mark the stalks of corn when you pollinated them

I mark the corn with clothes pins and use a sharpie to put the date on them.  Why do I do this?  It is noted that approximately 21 days after the silks emerge, the corn is ready to be harvested.  So, quickly at a glance when I go out to the garden to see what needs harvested, I can easily look at the clothes pins and see which ears ned to be pulled.

As an example – today only five of the corn stalks had a good amount of silks on them and were pollinated.  So I put the date of "22" on the clothes pin.  Tomorrow I may have more that need to be pollinated, so that will be "23" and so on.  Not all the corn will be ready for pollination at the same time

Here is a photo showing the clothes pin with the date.

Clothes Pin Showing Date Pollinated

And that is how to manually pollinate corn!

As a side note, I learned something from last year.  Pollen will only last a day or two after being shaken.  This is mostly due to humidity getting to the pollen and making it clump together.  At this point, the pollen isn't good.  So, ensure that you have a good supply of pollen.  I recommend only clipping off the tassels of plants that have a decent amount of silks showing on them so you can shake the pollen and use it the same day.  With the method of cutting the tassels off and shaking them, one tassel will easily cover 5+ stalks of corn.

Another side note – you also need to check on the corn you pollinated for a few days.  If you notice that more silks have emerged (easy to tell if you have cut all of them to the same length as the new silks will be longer and stand out), you need to ensure to pollinate the new strands of silk and cut those back as well.  Otherwise, you won't get a kernel in that spot of the cobb.

Also note that many times, you will get two ears of corn per stalk.  While you pollinate the first set of silks, you will need to go back and pollinate the second set when they emerge.  Again, I will do the same exact procedure above – and also not on the clothes pin the second date that the second ear had silk emerging and was pollinated.

Canning, Corn, Green Beans, and Lettuce Planting

Wow, it has been over a week since the previous post!

Back on August 12th – a day after the last garden update, the wife & I canned some goodies!  With the tomatoes and cucumbers we picked the day before, it was time to put some of them to use.  There was just too much to eat within a few days, so why not can them!

We canned five containers of tomatoes and four containers of pickles.  I do have to say – the Burpee Pickler cucumbers are much better for canning!  They seem to be more crisp and do not have nearly the number of seeds – although they did have some seeds.

To make the pickles, we just cut the cucumbers up into slices and filled the jars with them.  During this time, we had a package of the Ball's Picking Mix going over the stove at a boil.  The pickling mix was about $2 at the local farm store.  For the picking mix, it requires one package, six cups of water, and 2.5 cups of vinegar.  The mix says it will make four quarts, but we still had enough left to do another quart (which I did yesterday night).  I guess it all depends on how well you fill the jars.  Then, put in a hot water bath for 15 minutes.  Ensure the hot water bath is at a rolling boil before starting the countdown.

To make the tomatoes, we dipped each tomato in hot boiling water for about a minute.  Then, cut a small incision in the tomatoes and peel the skins right off!  Afterwards, ensure to cut the pieces however you wish before putting them in the cans.  Make sure to really press as much as you can into the jar – otherwise you will be left with air bubbles (which over time go to the top and make the water level lower) and you will also be left with a large gap of water solution at the bottom while all the tomatoes float towards the top.  Add two tablespoons of lemon juice to each container (used to lower the pH to allow the tomatoes to preserve longer) and then put in a hot water bath for 45 minutes.  The hot water bath needs to be going at a rolling boil before you start the countdown.

So, here is the results of a day of canning on August 12:

Tomato and Pickle Canning

Now, onto items from yesterday and today.

Yesterday I canned another good amount of tomatoes and pickles.  This time, it was three quarts of pickles and six quarts of tomatoes.  Last time I had trouble with the water level in the tomatoes so I added the two tablespoons of lemon juice and some water into the cans beforehand.  I then pushed the tomatoes into each can.  Well, this didn't work all that well either – and it seems I was able to get more tomatoes in the jars by putting the tomatoes in first – then adding the lemon juice and water.  The gap at the bottom this time seemed to be over an inch – so I just ended up using more jars than really was needed.  I probably could have put the six quarts of tomatoes in five quarts.

So far to date, we have quite a bit of canning that has been done!

Canning Done So Far

This morning I got up and decided that the Black Simpson Elite lettuce needed to be transplanted into the garden.  I wasn't exactly sure where to put the lettuce at, but I made room by taking out some old green bean plants.  The green plants taken out were in the front bed next to the peppers.

Black Simpson Elite Lettuce Transplanted

While planting the lettuce, I noticed that there were a few red California Wonder peppers!  Wow, I was surprised to see those!  There were three peppers that were in different stages of turning red, but I picked all of them today.  After seeing these, I am thinking that the rest of them will be harvested when they are red.

Red California Wonder Peppers

Just a quick picture of the back green bean bed – it is coming along rather nicely and there have already been some green beans picked from here!

Green Beans

Well, another tragedy hit the corn a few days ago.  We had another bomber of a storm come through with 60+ mile per hour winds.  There was at least one tornado that touced down about 45 miles southwest of us from this storm as well.  Well, when the storm hit us, it knocked down all of the corn again.  When I got home and saw the devestation, I was quite ticked off and blew off some steam by saying I wasn't going to do anything about it – that I was fed up with nursing the corn back to life.  Well, after about 30 minutes, I went out there with some stakes and twine – and I tied up each of the three rows of corn to one another and attached them to some stakes to keep them in place.  The Peaches & Cream corn is over five feet tall now and are just beginning to put on their tassels.

Unfortunately, the Sugar Dogs corn isn't goign to produce very well – if any.  I left them in the small starter planters way too long (about three weeks) and this was enough to stunt them and make the corn think they were robbed for nutrients and space.  The Sugar Dots corn ranges in height between two feet and four feet tall – and the tassels have already emerged on them and pollen is coming out.  So, it is quite a shame but over 90 of the corn plants are not going to produce – but we should get about 50 cobbs out of the Peaches & Cream.

While I can't speak for the flavor of Peaches & Cream yet, I still think it is going to be worth the extra cost of purchasing the Sugar Dots corn online – since it isn't sold around here any longer.  The flavor was fantastic and each stalk put on two ears of corn.  So, it is basically getting double the production out of the same amount of area.  Time will still tell for the Peaches & Cream corn since I don't see any spot on the corn where the ears will emerge yet.

Peaches & Cream Corn

Garden Update – August 11, 2009

Time for another full garden update with pictures.

Yesterday the wife picked over five pounds of green beans – yes FIVE pounds of green beans!  Previously the most I picked was maybe a bit over two pounds so this was quite the increase.  But, there are double the number of green beans in the front garden now.

Green Beans

The beans we planted were the Bush Blue Lake 274 and Bush Blue Lake 47.  One of them (can't remember which now but it is in my paper logs) had a much better germination rate than the other – so I'll ensure to only buy those next year.

The front garden is busting at the seams!  The green beans are really taking over and growing well, and the Sugar Dots corn down the middle is just keeping ahead of the growth of the green beans.

Front Garden

The California Wonder pepper plants at the end of this garden have a large amount of peppers on them!  So far we've picked about 17 peppers from these eight plants and they keep producing.

 California Wonder Pepper plants

Meanwhile, the newest batch of green beans planted in the new raised bed are doing well.  They don't seem to stand well on their own, however.  Whenever I water them (since we haven't had rain in several days now), many of them fall over – but they seem to perk back up overnight.

Green Bean Patch

The Sugar Dots corn alongside the driveway are still coming along, but they are not doing all that well since they appear to only get between three and three and a half hours of sunlight a day.  The sun is getting lower in the sky day by day, and it isn't making it over one of the huge trees in the woods behind the house.  Then it starts to set over the garage on the other side of the driveway which shades them back out.

As for the potato bin – that one potato plant is still growing and is drooping over the side of the container.

Sugar Dots Corn

The Kennebec potatoes planted in this area of the garden are doing very well and continue to put more stems out.

Kennebec Potatoes

 The corn against the house and in various containers is doing spectactular!  They've grown very tall already.  They are at least two feet tall at this point.  There is a combination of Sugar Dots corn and Peaches  & Cream corn in the containers, and in the bed to the right side is all Peaches & Cream corn.

Peaches & Cream Corn

About a week and a half ago I planted 21 new seedlings of Black Simpson Elite lettuce to get ready for a fall crop.  Out of those 21, 19 have sprouted and so far they are doing well.  The weather over the weekend went up to about 90 – 92 degrees so I had to bring them inside on those days.  But, for the past two days, the weather has been mid-to-upper 80's.  I didn't expect so many lettuce to sprout as I was wanting about 12 plants.  Last time we had 12 (although one died after the first picking of lettuce) and we still gave quite a bit of lettuce to our neighbor.

Black Simpson Elite Lettuce Seedlings

Meanwhile, in the backyard, the cucumbers keep growing and there must be at least a dozen cucumbers on the Burpee Pickler and Marketmore 76 vines (one of each).  I was a bit surprisedwith the Burpee Pickler cucumbers because they are quite a bit larger than I expected.  While they aren't as large as the Marketmore76, they still are a good six or so inches long and the diamater is at least half that of the Marketmore 76.  When I purchased those seeds, I expected they would have been small cucumbers like what you find in non-cut pickles.

Marketmore 76 & Burpee Pickler Cucumbers

You can see in the front of the picture – the sad Red Cherry Tomato plant.  The other plant was pulled a few weeks back as it was fully dead, and this one is on it's way.  We have pulled maybe a pound of cherry tomatoes from this plant so far (pictures below).

The Best Boy and Roma tomato plants are doing alright, although the Best Boy plants are about dead as well.  The Roma tomato plants are the only ones that faired well this year.  But, the Best Boy tomatoes have given us some spectacular tomatoes – one was up to 12 ounces while most are around 6 – 8 ounces.

Roma & Best Boy Tomatoes

 Now, let me show you what was picked today.  There was almost three pounds of Roma tomatoes picked today along with almost three pounds of cucumbers.

There were a total of 21 Roma tomatoes on the scale:

Roma Tomatoes

Here in the cucumber picture, you can see the dark green cucumber – this one is the Burpee Pickler.  The other three are the Marketmore 76 cucumbers.  See that it is just as long as the Marketmore 76 cucumbers, but the diameter is about half.

Burpee Pickler & Marketmore 76 Cucumbers

And then a combination photo of the tomatoes and the cucumbers to end the post.

August 11 Harvest